Puget Sound Siding: Pre-Install Moisture Inspection Checklist
Replacing siding is a chance to check for moisture damage and review how the wall manages water. Use this checklist to prepare questions for your project team before new siding covers the wall.
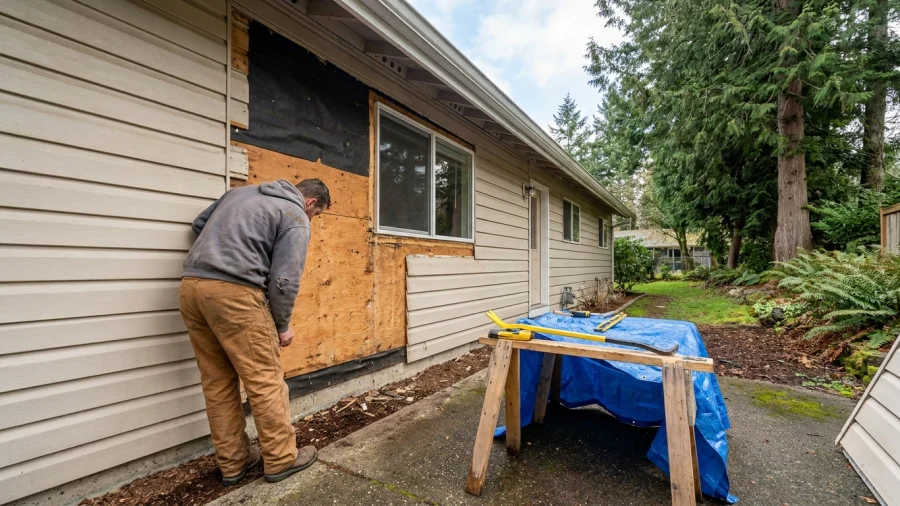
In Puget Sound’s rainy, wind-exposed climate, a siding project involves more than choosing a new exterior finish. Once old siding comes off, the project team can see portions of the wall that are usually hidden. Planning for that inspection helps homeowners understand what needs attention before new materials go on.
Why moisture inspection matters before new siding
New siding does not, by itself, stop water entering a wall or resolve moisture already trapped inside it. Water may enter at joints, openings, and transitions; it may also linger if drainage or drying paths are disrupted. A wall that looks sound from the outside can have damaged sheathing, framing, or areas around windows and doors.
This checklist is a way to prepare questions, not a substitute for a qualified inspection. Some concerns require further evaluation or opening concealed areas. Before work begins, share any known leaks or recurring damp spots and agree on how the team will document and report damage found during removal.
Before removal: record clues and discuss the inspection plan
Walk around the house and photograph conditions you want the installer to review. Check nearby interior walls too, but avoid treating a stain or odor as proof of a particular leak source.
- Record peeling paint, swollen or soft trim, staining, siding gaps, failed caulk, and places that stay damp.
- Note interior staining, bubbling paint, musty odors, or changes near exterior windows and doors.
- Point out roof-to-wall intersections, decks, hose bibs, vents, exterior lights, and other wall penetrations.
Ask who will inspect exposed sheathing, how findings will be shared, and how proposed repairs or scope changes will be discussed before work continues. Confirm how exposed wall areas will be protected if rain arrives during the project.
While the wall is open: check sheathing, framing, and signs of water
After siding removal, the project team can check exposed areas for discoloration, water marks, swollen or delaminated sheathing, soft spots, corroded fasteners, and visible decay. Windows, doors, corners, roof intersections, decks, and plumbing or electrical penetrations deserve particular attention because several materials meet in these locations.
A surface stain does not necessarily mean moisture is still entering the wall, and the full extent of damage may not be visible right away. Ask for clear photos and a plain-language explanation of what the team observed, what remains uncertain, and what repair they propose. Visibly wet or damaged material should be discussed with the project professional before it is covered.
Review the water-management details before siding goes back on
Siding is one part of a wall’s water-management system. Ask how the water-resistive barrier or drainage plane will stay continuous at seams and transitions, and how flashing will direct water away from windows, doors, roof-to-wall intersections, decks, and other vulnerable locations.
- How will vents, pipes, lights, and other penetrations connect to the surrounding water-management layers?
- How is the selected siding system intended to drain or dry, and which product installation requirements apply?
- How will bottom edges and other drainage paths remain clear of soil, paving, and debris?
Details vary by siding product and wall condition. The installation plan should follow the selected system’s requirements rather than assume every siding type handles drainage the same way.
Check site conditions that can keep siding wet
Even a carefully detailed wall can be repeatedly soaked by conditions around the house. Note soil, mulch, or paving close to the siding, and ask whether the available clearance meets the selected product’s installation guidance. Look for clogged gutters, downspouts discharging beside the foundation, and roof runoff splashing onto walls.
Shrubs, stored items, and deck components can restrict airflow or hold moisture against siding. Wind-driven rain and shaded elevations may also leave some Puget Sound walls wet longer than others. Correcting drainage or landscaping conditions may be a separate project, so identify those items rather than assuming they are included in siding work.
Before the wall is closed: use this homeowner sign-off checklist
- Were exposed areas inspected, with moisture-related concerns photographed and explained?
- Were agreed repairs completed before new siding covered the affected areas?
- Were flashing, water-resistive barrier transitions, and penetrations addressed in the installation plan?
- Are any conditions unresolved or in need of separate evaluation or follow-up?
- Do your home records include project photos, change documentation, product information, and installation details?
Reviewing these items with the project team creates a useful record for future maintenance. Documentation does not replace product-specific installation instructions or a professional assessment when a condition remains unclear.
What to do if the inspection finds a moisture problem
Ask the project team to describe the observed condition and its location, and to distinguish a confirmed water source from a suspected one. Before approving additional work, request a written description of the recommended repair and any change to the project scope.
Extensive damage, recurring wetness, or an unclear source may call for evaluation by an appropriately qualified building-envelope or moisture professional. The goal is to address active water entry and drainage concerns in the overall plan, not simply cover the visible wall with new siding.