Top Siding Installation Mistakes to Avoid in Puget Sound Homes
In Puget Sound’s wet climate, siding performance depends on more than the boards you can see. Learn which installation details deserve attention before, during, and after a siding project.

New siding can improve a home’s appearance, but its lasting performance depends on the wall assembly beneath it and the details at every edge and opening. For Puget Sound homeowners, understanding common siding installation mistakes makes it easier to review a project plan and recognize questions worth raising while work is underway.
Why installation details matter in Puget Sound
Frequent rain, damp weather, and wind-driven water can expose weak points in an exterior wall. Siding sheds much of that water, while the water-resistive barrier, flashing, and other layers behind it help manage water that gets past the visible surface. Those layers need to direct water outward and downward rather than hold it against the wall.
Installation requirements differ among fiber cement, vinyl, wood, composite, and metal siding, and the existing wall matters too. Not every siding problem comes from installation, but checking the details specified for the chosen product can help prevent avoidable trouble.
Mistake 1: Treating the siding as the home’s only water barrier
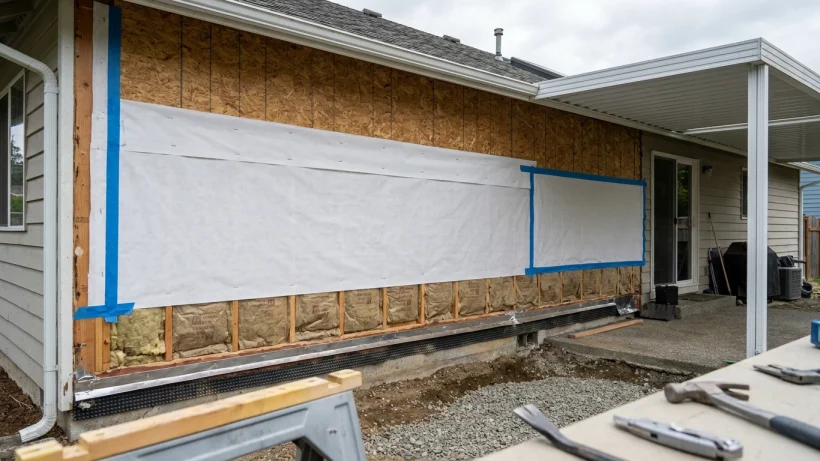
Siding is not meant to be the wall’s only defense against rain. A water-resistive barrier behind it helps direct incidental water toward a path out of the assembly; it does not make the wall waterproof. If barrier laps or transitions send water behind that layer, vulnerable wall materials may stay wet.
The appropriate drainage approach depends on the product, wall assembly, and weather exposure. Before work begins, ask how water that gets behind the siding will move outward and down, especially near windows, doors, and utility openings.
Mistake 2: Skipping or misplacing flashing at openings and transitions
Windows, doors, roof-to-wall intersections, deck ledger areas, and hose or vent penetrations interrupt the siding surface. These spots need details that guide water back out. Flashing works best as part of the wall’s drainage layers, installed in a sequence that sheds water; a visible bead of caulk is not a substitute for that integration.
Before new siding covers these areas, discuss how existing windows, trim, and penetrations will be handled. There is no single flashing detail for every home, so the plan should reflect the products and conditions actually present.
Mistake 3: Installing over damaged or poorly prepared sheathing
New siding should not simply conceal soft sheathing, persistent staining, musty odors, or deteriorated trim. These are reasons to assess the area, not proof of a particular cause or repair. Some conditions only become visible after the old siding comes off.
A useful project plan distinguishes routine preparation from repairs that may need further evaluation. If concealed damage appears, document what was found and discuss the appropriate scope change before the area is covered again.
Mistake 4: Getting clearances wrong at roofs, decks, grade, and hard surfaces

Siding placed too close to soil or surfaces that collect and splash water can face prolonged moisture exposure. Lower wall edges deserve particular attention near roofing, deck surfaces, steps, concrete walkways, and landscaping.
Required spacing and edge treatment vary by siding product and assembly, so a single clearance measurement will not fit every project. Review how these transitions will be finished before installation, including the trim and flashing needed at the specific locations on your home.
Mistake 5: Using the wrong fastening or installation method for the siding
Fastener type, placement, and spacing affect both appearance and performance. Overdriven or misplaced fasteners, incorrect spacing, or fastening that prevents expected material movement can create problems as temperatures and moisture conditions change.
Fiber cement, vinyl, wood, composite, and metal siding each have their own handling and attachment requirements. Cut edges, joints, and panel ends may also need specific treatment. Ask which manufacturer instructions will guide the crew and how fastening will be checked as installation progresses.
Mistake 6: Ignoring ventilation, drainage paths, and material-specific details
Some siding assemblies include a drainage space or other provisions that help incidental moisture leave the wall. Blocking an intended exit or ventilation path can work against that design. At the same time, other gaps do need sealing; the difference depends on the chosen system and location.
Trim, corner boards, joints, and accessory components should suit the selected siding rather than being treated as interchangeable. Ask how the design handles water exit points and transitions between materials, particularly where siding meets trim or other exterior surfaces.
Mistake 7: Rushing the final inspection and leaving details undocumented
Walk the exterior with the project representative before the crew wraps up. Look for loose or visibly uneven courses, unfinished edges, unexpected gaps, damaged pieces, and inconsistent trim transitions. Compare the completed areas and accessories with the agreed scope, and record items that need follow-up.
A visual walkthrough cannot confirm every concealed barrier or flashing detail. Ask about work that is no longer visible, and keep the project documents, product and care information, and follow-up notes together for future reference.
A homeowner’s short checklist before siding work starts
Use these questions to compare the proposed work with the conditions on your home:
- Which siding product is specified, and which installation instructions will guide the work?
- How will the water-resistive barrier, flashing, and transitions around windows, doors, and other openings be handled?
- What happens if removal reveals damaged sheathing or trim, and how will any scope change be documented and discussed?
- How will the crew address clearances, penetrations, drainage paths, and product-specific fastening?
- What will be reviewed at completion, and which product care information and project records will be provided?