Why Siding Buckles: How to Spot Improper Nailing vs. Water Damage
Wavy or bulging exterior siding can stem from simple nailing errors or hidden moisture intrusion behind the wall. Learn how to tell the difference on your Pacific Northwest home.
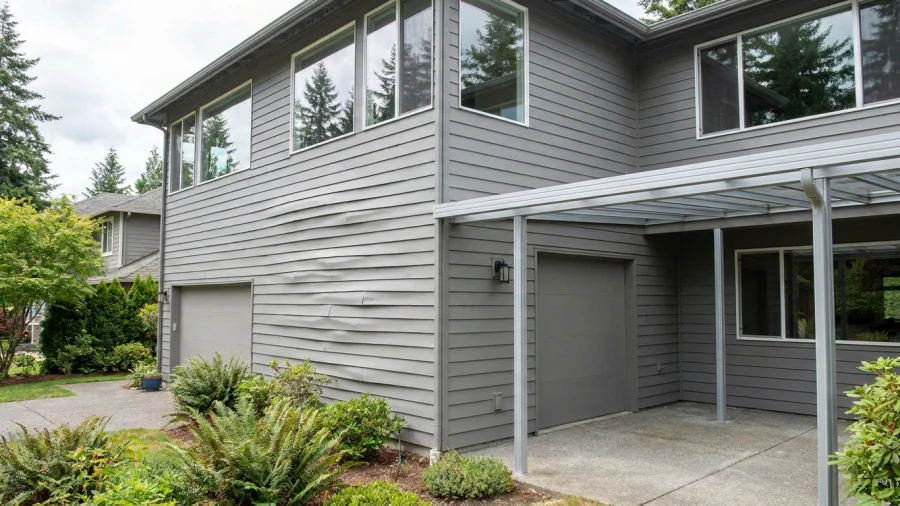
Noticing a wavy, rippled, or bulging section of siding on your home can be unnerving. Siding is your home's primary shield against the continuous drizzle, wind-driven rain, and damp air characteristic of Western Washington. When panels begin to distort, homeowners often jump to worst-case scenarios involving catastrophic structural rot. While moisture intrusion is certainly a serious concern around Puget Sound, siding distortion is frequently caused by something far simpler: mechanical installation mistakes related to fasteners and thermal movement.
Distinguishing between a cosmetic nailing defect and active water damage behind the wall assembly is critical. Addressing an installation issue requires adjusting panel tolerances, while ignoring water penetration can lead to decayed wall sheathing, compromised framing, and costly structural repairs. Here is how to evaluate the root cause of buckled siding safely and accurately.
Understanding Siding Buckling in Pacific Northwest Climates
In the exterior remodeling industry, siding buckling describes any condition where horizontal or vertical cladding deviates from a true, flat plane. This shows up as visible waves along a wall elevation, pronounced outward bulges, or panel seams pulling apart and gaping open. In Western Washington, where homes shift between wet, cool winters and warm, direct summer sun, siding materials experience constant micro-movements.
Every exterior cladding system must accomplish two contradictory tasks: seal out sustained precipitation and expand or contract freely as temperatures fluctuate. When either thermal movement is restricted or the framing behind the cladding swells from trapped rainwater, the material has nowhere to go except outward, creating visible buckling.
The Culprit of Installation: Improper Nailing and Clearance Errors
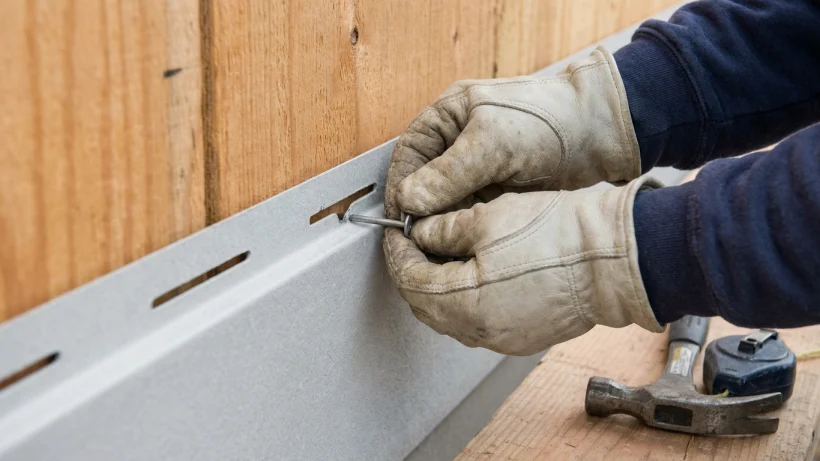
Thermal expansion is a basic law of physics that every siding installer must plan for, particularly when working with vinyl and composite claddings. A twelve-foot vinyl siding panel can expand and contract by nearly half an inch between a freezing winter night and an eighty-degree summer afternoon in King or Pierce County. To accommodate this swing, siding must be hung rather than tightly fastened.
Installation-related buckling usually traces back to four common mechanical mistakes:
- Overdriven fasteners: When nails or staples are driven flush against the panel hem, the head clamps the material hard against the wall sheathing. When the panel tries to expand in the sun, it cannot glide horizontally and buckles outward.
- Off-center nailing: Most siding products feature elongated factory nailing slots. Fasteners must be driven directly into the center of these slots. A nail placed at the far edge acts as a mechanical stop, binding the siding during temperature changes.
- Angled fasteners: Driving nails at an angle distorts the slot and pinches the material unevenly against the substrate.
- Missing expansion gaps at perimeters: Cladding requires a quarter-inch clearance (or up to three-eighths of an inch in cold weather) inside receiving channels, corner posts, and window trim. If panels are cut too long and butt tightly against the trim, they immediately bow when heated.
The Culprit of Moisture: Hidden Rot and Swollen Sheathing
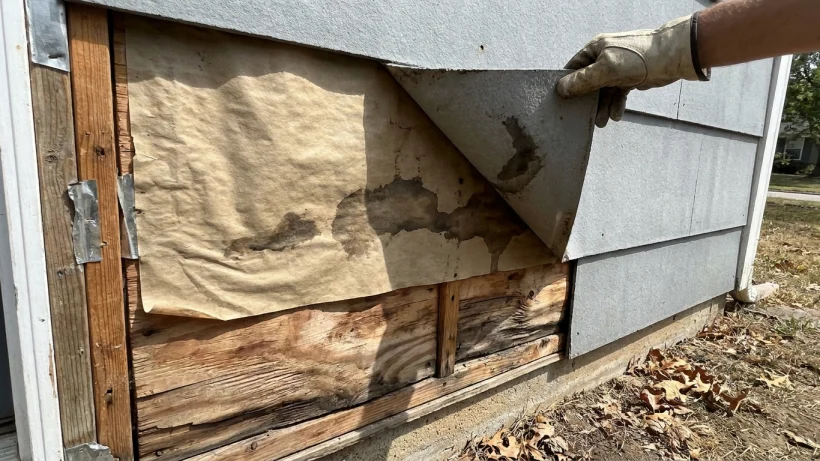
When buckling is driven by moisture, the problem is not how the siding was fastened, but what is happening to the structural wall beneath it. In Western Washington, prolonged driving rain can exploit minor gaps in exterior flashings, especially around window headers, roof-to-wall intersections (kickout areas), and deck ledgers.
Once bulk water bypasses the primary drainage plane and saturates the housewrap or asphalt felt, it soaks into the oriented strand board (OSB) or plywood wall sheathing. OSB in particular is prone to significant edge swelling when subjected to repeated moisture cycles. As the wooden sheets expand in thickness, they physically push outward on the siding planks attached to them.
Over time, persistent dampness fosters fungal decay. As the wooden studs and sheathing soften into rot, they lose structural integrity. Fasteners holding the siding lose their grip and back out under the wall's static weight, producing localized sags, bulges, and loose boards. These issues tend to become markedly more pronounced during the wettest months between November and April.
Diagnostic Checklist: Nailing Issues vs. Water Intrusion
To determine whether your siding is suffering from fastener tension or hidden substrate damage, walk the perimeter of your home and evaluate the following diagnostic indicators:
- The Horizontal Slide Test (Vinyl/Clad Panels): Place your palm flat on the buckled panel near the nail hem and apply moderate pressure sideways. If the panel slides slightly back and forth (roughly 1/4 inch), it is hung properly and the issue may be substrate-related. If the panel is completely rigid and will not budge, it is almost certainly nailed too tightly.
- Firmness to the Touch: Gently push inward on the apex of the bulge. If the siding feels springy, hollow, and snaps back against a firm backing, thermal buckling is the likely cause. If the wall behind the siding feels spongy, soft, or yields significantly, the structural sheathing has likely decayed.
- Sun Exposure and Timing: Observe when the distortion appears. If the ripples emerge primarily on south- or west-facing elevations during warm, sunny afternoons and flatten out by morning, thermal expansion against tight fasteners is the culprit. If the bulge is persistent year-round and located directly beneath a roof valley, chimney, or window sill, suspect water intrusion.
- Accompanying Interior and Exterior Signs: Check the interior wall directly opposite the exterior bulge for peeling paint, drywall discoloration, or a musty odor. Look outside for rusted exterior nail heads, fungal staining at foundation splash lines, or failed sealant joints around adjoining trim.
How Siding Material Changes the Risk Profile
Different exterior cladding materials react distinctly to moisture and fastener errors. Recognizing how your specific product responds helps narrow down the diagnosis:
- Vinyl Siding: Completely impervious to rot or water damage itself, but highly susceptible to severe thermal expansion and contraction. Nearly 90 percent of vinyl siding buckles are caused by overdriven fasteners, missing terminal clearances, or distorted nail hems.
- Fiber Cement: Dimensionally very stable during temperature swings, meaning it rarely buckles from heat alone. However, if face-nailed improperly or pinned without clearance, boards will snap or crack rather than bow. When fiber cement appears wavy, it almost always points to swollen wall framing, uneven wall studs, or rotting sheathing underneath.
- Engineered Wood: Coated with resins and waxes to resist ambient moisture, but cut field edges that were left unsealed during installation can absorb water. This causes edge swelling, cupping, and localized bulging along panel laps.
- Natural Cedar: Prone to cupping, curling, and buckling if nailed through both laps (restricting natural seasonal movement) or installed without an adequate rainscreen gap to promote back-ventilation in damp Puget Sound microclimates.
Safe Homeowner Inspection Steps and When to Call a Pro
Performing an initial assessment does not require tearing apart your exterior. Start from the ground using a pair of binoculars to inspect roofline flashings, gutter overflows, and caulking joints around the affected area. Avoid using pry bars, screwdrivers, or claw hammers to pull siding away from the wall; modern siding profiles can easily crack when cold, and blindly levering panels can tear the underlying weather-resistant barrier, transforming a cosmetic problem into an active leak.
If the buckled wall sits adjacent to an accessible crawl space or unfinished attic space, step inside with a bright flashlight. Check the rim joists, top plates, and interior plywood faces behind the problem area for dark moisture staining, efflorescence, active dampness, or pest activity.
If your inspection reveals spongy sheathing, rusted framing nails, or persistent bulges beneath flashing junctions, homeowner troubleshooting has reached its safe limit. A licensed exterior contractor can use non-invasive moisture meters and precision siding removal tools to unzip individual courses, verify the health of the underlying wood, and correct the issue before wet Pacific Northwest weather causes further hidden damage.